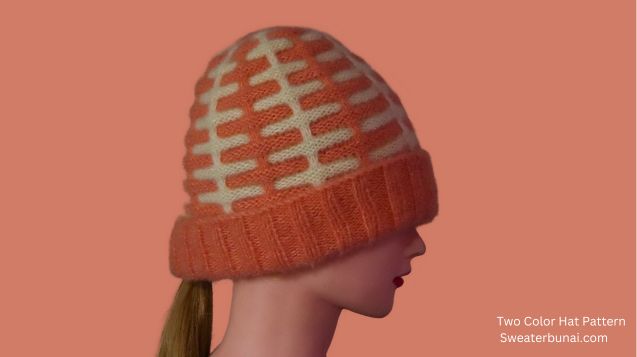
Hello friends! Until now, all the hats I’ve brought to you were made in a single color, but today I’m excited to share a beautiful two-colored folded brim hat pattern.
To knit this hat, you’ll need a combination of one light and one dark color. I made this hat in orange and cream and it turned out beautiful!
This hat, once completed, gives the exact look of a ready-made hat. It looks gorgeous on women and baby girls. However, by choosing the right color, you can also make this hat for men.
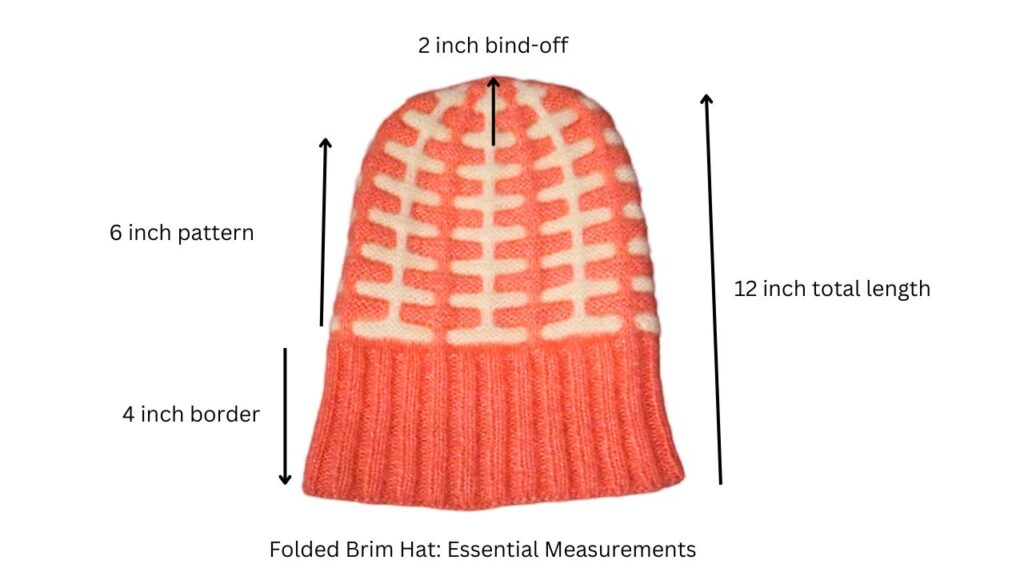
The border of the hat is made foldable, so the border length has been kept longer. This increases the overall length of the hat, ensuring that when folded up, the hat doesn’t become too short. Here, I made the total length 12 inches.
I’ve attached the video tutorial for this hat below. You can easily make the hat with the help of the video. So, let’s get started and learn how to knit this beautiful and stylish double-colored Folded Brim Knit Hat!
Table of Contents
Materials Needed for the Folded Brim Knit Hat
Yarn– 90 Gram Oswal 3 Ply Chenille Yarn
Needle– 9 Number Straight Needles ( 3.5MM)
Abbreviations Used in the Folded Brim Knit Hat
SL- Slip
K – Knit
P – Purl
STS – Stitches
RS – Right Side
WS – Wrong Side
YF – Yarn in front
YB – Yarn in back
P2tog – Purl 2 sts together
K2tog – Knit 2 sts together
Knitting the Double-Colored Folded Brim Hat: A Complete Guide

Size– 18 to 24 inches
Skills– Beginners / Intermediate
Cast on- To knit a folded brim hat, I cast on 100 stitches.
2×2 Rib Stitch for the Brim
I knitted a simple 2×2 rib stitch for the brim. The first and last stitches are purl to serve as edge stitches, which are used for seaming.
A foldable brim/border has been knitted for the hat, hence the border length is 4 inches. The border/brim pattern is given below.
Row 1 (RS) – P1 * K2, P2 * repeat from * to * …………..last sts P1
Row 2 (WS) – Same as Row 1 (Knit in knit & Purl in Purl)
Repeat these rows until the brim is complete. I have knitted a 4-inch brim.
After completing the border/brim, you need to knit 3 rows in stockinette stitch (knit one row, purl the next). After that, we’ll start adding the design to the hat.
RS – Purl all sts
WS – P1, Knit all sts, P1
RS – Purl all sts
Step-by-Step Pattern Guide for a Folded Brim Hat
The design added to the hat is very simple and consists of a total of 12 rows. In this pattern, 6 rows will be knitted with one color, and the remaining 6 rows will be knitted with the other color.
The hat’s border/brim is designed to be foldable, so we need to place the design on the back side of the hat. This way, when we fold the border, the right side of the hat will face upwards.
2nd color (White).
Row 1 (WS) – P1, K6, * SL2, K12 * repeat from * to * …………….. last 9 sts SL2, K6, P1
Row 2 (RS) – P1, K6, * YF, SL2, YB, K12 * repeat from * to * ……………………….. last 9 sts YF, SL2, YB, K6, P1
Row 3 (WS) – P7, * YB, SL2, YF, P12 * repeat from * to * …………………………….. last 9 sts YB, SL2, YF, P7
Row 4 (RS) – Same as row 2
Row 5 (WS) – Same as row 1
Row 6 (RS) – P7, * SL2, P12 * repeat from * to * …………….. last 9 sts SL2, P7
1st color (Orange).
Row 7 (WS) – P1, K13, * SL2, K12 * repeat from * to * ………..last 16 sts Sl2, K11, SL2, P1
Row 8 (RS) – P1, SL2, YB, K11, * YF, SL2, YB, K12 * repeat from * to * ………… last 16 sts YF, SL2. YB, K13, P1
Row 9 (WS) – P14, * YB, SL2, YF, P12 * repeat from * to * …………last 16 sts YB, SL2, YF, P11, YB, SL2, YF, P1
Row 10 (RS) – P1, SL2, YB, K11, * YF, SL2, YB, K12 * repeat from * to * ……………….. last 2 sts K1, P1
Row 11 (WS) – Same as row 7
Row 12 (RS) – P1, SL2, P11, * SL2, P12 * repeat from * to * …………………. last 16 sts SL2, P14
Repeat these 12 rows until you have knitted a length of 6 inches.
Step-by-Step Guide to Binding Off Folded Brim Hat
Once the hat reaches the desired length, we’ll start decreasing the stitches. Decreasing the stitches will increase the length of the hat by approximately 2 inches. How to bind off the hat is explained in detail below.
2nd color (White).
Row 1 – P1, K6, * SL2, K12 * repeat from * to * …………….. last 9 sts SL2, K6, P1
Row 2 – P1, K6, * YF, SL2, YB, K12 * repeat from * to * ……………………….. last 9 sts YF, SL2, YB, K6, P1
Row 3 – P7, * YB, SL2, YF, P12 * repeat from * to * …………………………….. last 9 sts YB, SL2, YF, P7
Row 4 – Same as row 2
Row 5 – P1, K2, K2tog, K2, * SL2, K2, K2tog, K4, K2tog, K2 * repeat from * to * ……….. last 9 sts SL2,K2, K2tog, K2, P1
Row 6 – P1, P5, * SL2, P10 * repeat from * to * …………… last 8 sts SL2, P6
1st color (Orange).
Row 7 – P1, K11, * SL2, K10 * repeat from * to * ………….. last 14 sts SL2, K9, SL2, P1
Row 8 – P1, SL2, K9, * YF, SL2, YB, K10 * repeat from * to * ………….. last 14 sts YF, SL2, YB, K11, P1
Row 9 – P1, P2, P2tog, P3, P2tog, P2, * YB, SL2, YF, P2, P2tog, P2, P2tog, P2 * repeat from * to * …………… last 14 sts YB, SL2, YF, P2, P2tog, P2, P2tog, P1, YB, SL2, P1
Row 10 – SL1, SL2, YB, K7, * YF, SL2, YB, K8 * repeat from * to * ………….. last 12 sts YF, SL2, YB, K9, P1
Row 11 – SL1, K9, * SL2, K8 * repeat from * to * ………… last 12 sts SL2, K7, SL2, P1
Row 12 – SL3, P7, * SL2, P8 * repeat from * to * …………….. last 12 sts SL2, P10 ,
2nd color (White).
Row 13 – P1, K4, * SL2, K8 * repeat from * to * ……………… last 7 sts SL2, K4, P1
Row 14 – SL1, K4, * YF, SL2, YB, K8 * repeat from * to * ……………………. last 7 sts YF, SL2, YB, K4, P1
Row 15 – P1, P2tog, P2tog, * FB, SL2, YF, P2tog ( 4 times ) * repeat from * to * ……….. last 7 sts YB, SL2, YF, P2tog, P2tog, P1
Row 16 – P1, K2, * YF, SL2, YB, K4 * repeat from * to * ………………. last 5 sts YF, SL2, YB, K2, P1
Row 17 – P1, K2, * SL2, K4 * repeat from * to * ……………. last 3 stsSL2, K2, P1
Row 18 – P3, * SL2, P4 * repeat from * to * ……………. last 5 sts SL2, P3
1st color (Orange).
Row 19 – P1, K5, * SL2, K4 * repeat from * to * …………….. last 8 sts SL2, K5, P1
Row 20 – P1, K5, * YF, SL2, YB, K4 * repeat from * to * ……………………. last 8 sts YF, SL2, YB, K5, P1
Row 21 – SL1, P1, P2tog, P2tog, * YB, SL2, YF, P2tog, P2tog * repeat from * to * ……… last 8 sts YB, SL2, YF, P2tog, P2tog, P2
Row 22 – P1, K2tog, K1 * YF, SL2, YB, K2 * repeat from * to * ………………..last 4 sts YB, K1, K2tog, P1
Row 23 – SL1, P2tog, * YB, SL2, YF, P2tog * repeat from * to * …………. last sts P1
Row 24 – Purl all sts
Row 25 – Purl all sts
Row 26 – P2tog, P2tog ………………….. last sts P1
Row 27 – P2tog, P2tog ……………. last sts P1
Row 28 – P3tog, P3tog …………….
Row 29 – P2tog and secure it tightly.
To finish, we’ll sew up the hat, starting at the top and working our way down along the inside seam. Now your beautiful hat is ready to be worn!”
Step-by-Step Video Guide to Knitting a Folded Brim Hat
Join the Community: Share Your Work
I hope you enjoyed today’s folded brim knit hat blog post. If you’d like to join us, you can share your experience with us on our Facebook Group.
Ready for another knitting challenge? Explore my other free hat patterns.
Common Queries: Knitting the Perfect Folded Brim Hat
How do I knit the folded brim?
The folded brim is made by knitting a longer border in a 2×2 rib stitch pattern. This extra length allows the brim to be folded without shortening the hat.
What size should I knit the hat?
The pattern is designed for a one-size-fits-most adult head. If you need to adjust the size, consider increasing or decreasing the number of stitches cast on.
How do I bind off and finish the hat?
The hat is finished by gradually decreasing stitches and then binding off. Detailed instructions for binding off are provided in the pattern, ensuring a neat finish.
What materials do I need to knit the two-colored folded brim hat?
You will need two colors of yarn (one light and one dark), knitting needles, and optional accessories like stitch markers or a tapestry needle.

Leave a Reply