Today, I’m excited to share a stunning hooded scarf knitting pattern for women. I’ve tried to explain how to knit this hooded scarf in a very simple way. Additionally, for your convenience, I’ve attached a video tutorial of the scarf below.
Let’s start knitting the hooded scarf!
Table of Contents
Hooded Scarf Knitting Pattern: Materials Checklist
Knitting Yarn: (350 Grams) Vardhman Wool O Wool (Hand Knitting Yarn Wool- Composition 68% acrylic 32% Wool).
Knitting Needles: (3.25 mm) NO-10 Straight Knitting Needle.
Optional materials include a measuring tape, scissors, and a darning needle.
Abbreviations Used in Hooded Scarf Knitting Pattern
SL2tog: Slip 2 sts together knit-wise
P2tog: Purl 2 sts together
K2tog(FL): Knit 2 sts together from the front loop.
K2tog(BL): Knit 2 sts together from the back loop
SL(P): Slip(Purl Wise)
K: Knit
P: Purl
STS: Stitches
RS: Right Side
WS: Wrong Side
Step-by-Step Sunayana’s Hooded Scarf Knitting Pattern Tutorial
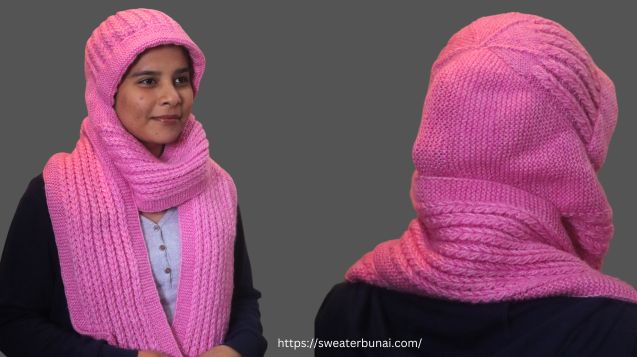
Size: 1 Size, Adult (To fit head circumference: 21-22”/22-23”), Scarf: 7.5″ width × 55″ length, Hood: 8″ width × 9.8″ height.
Skills: Intermediate/Beginner.
Skills used in the pattern: Casting On, 4 rows repeat Heart Ribbing Stitch Pattern, Purl sts (For Border), Increase/Decrease sts & Sewing Together a Seam.
Cast on: 84 sts for the hood, 47 sts for the scarf.
Step-by-Step Guide to Knitting a Hood
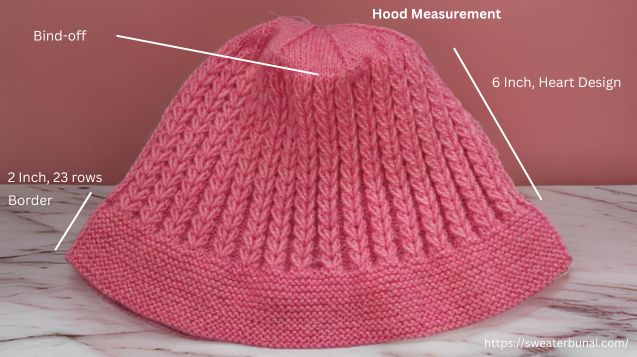
The first step is to knit the hood. We will begin by casting on 84 stitches for the hood.
I knitted the hood’s border purl-wise on both sides. The border consists of 12 stripes. I knitted a total of 23 rows(2 Inches), purling on both sides.
• Row 1 (RS): Purl all sts ………………… last sts K1
• Row 2 (WS): Purl all sts ………………… last sts K1
After completing the border, we will add the Heart Ribbing Stitch Pattern to the hat. You can choose any design you like. The important thing is that you must start the design from the wrong side.
What this means is that the right side of the design should be on the wrong side of the hat’s border, because we will be folding the border upwards. This way, the right side of the border will be facing up.
The design consists of 5 stitches. To adjust the design, we will add 2 extra stitches, and we need 2 stitches for the edges.
We have 84 stitches in total. Since we need to add 4 extra stitches for the design, 84 – 4 = 80 stitches are left for the design. Therefore, we will add our design 16 times, using 5 stitches for each design repeat.
Heart Ribbing Stitch Pattern:
To start the design, we will first knit two base rows. Base rows are the stitches that are added only once to begin the design. After that, these stitches are not repeated.
• Base Row 1 (WS): SL1, * P2, K3 * repeat from * to * ……………. last 3 sts P2, K1
• Base Row 2 (RS): SL1, * K2, P3 * repeat from * to * …………… last 3 sts K2, P1
• Row 1(WS): SL1,*P2, make a new sts from below 3rd block of middle sts of the 3 knitted sts, K3, make a new sts from the previous place * repeat from * to ……………… last 3 sts P2, K1
• Row 2(RS): SL1, * K2, yarn in front, SL1, P3, SL1, yarn in back * repeat from * to *………..last 3 sts K2, P1
• Row 3(WS): SL1, * P2, K2tog (Back Loop), K1, K2tog (Front Loop) * repeat from * to *……last 3 sts P2, K1
• Row 4(RS): SL1, * K2, P3 * repeat from * to * ………….. last 3 sts K2, P1
We will repeat from row 1 to row 4 and knit up to 6 inches above the border.
Now we will decrease the stitches according to the pattern given below.
• RS: K11, * SL2 tog ( knitwise ) then again slip sts take on left needle & knit K3tog from back loop, K17 * repeat from * to * …………………….. last repeat ending with K10
• WS: Purl all sts
• RS: K10, * SL2 tog ( knitwise ) then again slip sts take on left needle & knit K3tog from back loop, K15 * repeat from * to * …………………….. last repeat ending with K9
• WS: Purl all sts
We need to continue decreasing the stitches in this way until only 6 stitches remain on the needle.
Finally, we will cut the yarn a bit longer, thread it through a needle, and then thread all the stitches onto the yarn and tie them. Our hat is now complete. Now, we will knit the scarf.
Step-by-Step Scarf Knitting Guide
Cast on 47 sts.
We will knit a border of 10 stitches (1 inch) by knitting purl-wise on both sides.
• Row 1 (RS): Purl all sts ………………… last sts K1
• Row 2 (WS): Purl all sts ………………… last sts K1
We will use the same Heart Ribbing Stitch Pattern in the scarf, but for the scarf, we need to start the design from the right side.
A 5-stitch border has been added on both sides of the scarf. Now, we need to adjust the design in the 47 stitches, so 5 + 5 = 10 stitches will be reserved for the borders on both sides. After subtracting the borders, 47 – 10 = 37 stitches will be used for the design.
After adding the design, you will notice that the borders on both sides will have 7 stitches instead of 5.
The first part of the scarf has been made 40 inches long. You must keep the length of the first part of the scarf at least 40 inches, but if you want to make it longer, you can.
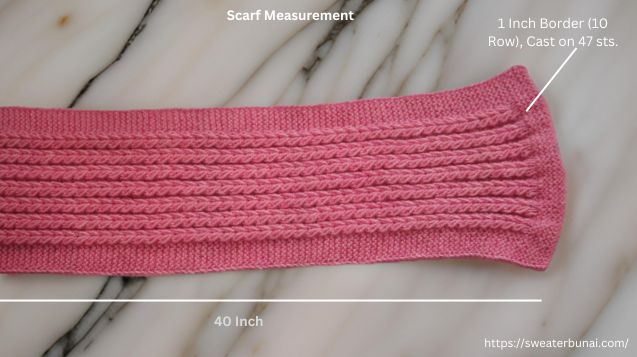
Once one side of the scarf is completed, we will create a triangular section to attach the hood to the scarf. To make the triangular section, we will first increase the stitches.
• RS: SL1, increase one sts, now knit as usual
• WS: don’t increase any sts and knit as usual
While knitting these two rows, we need to increase a total of 42 stitches. The number of stitches to increase will depend on your hood.
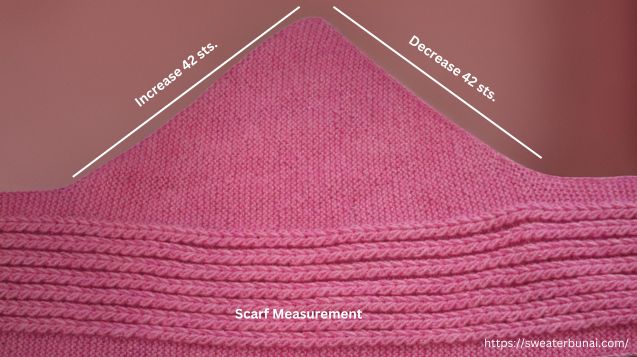
Now, just as we increase the stitches, we will decrease the same number of stitches. I increased 42 stitches, so I will decrease exactly 42 stitches.
• RS: SL1, P2tog, now knit as usual
• WS: Don’t decrease any sts and knit as usual
While knitting these two rows, we will decrease by 42 stitches.
Now we need to make the second part of the scarf, which will be made exactly like the first part. I have kept the length of the second part of the scarf at 15 inches, which includes the 10 rows / 2 inches border at the bottom along with the design. The borders of both parts will be made identically.
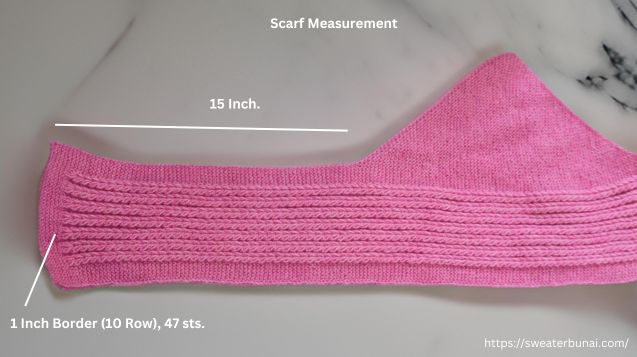
The length of this section should be enough so that after wrapping the first part of the scarf around the neck, the second part reaches the desired length.
Joining the Hood with the Scarf: Step-by-Step
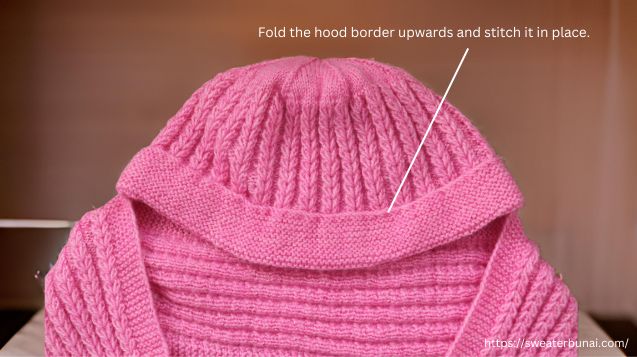
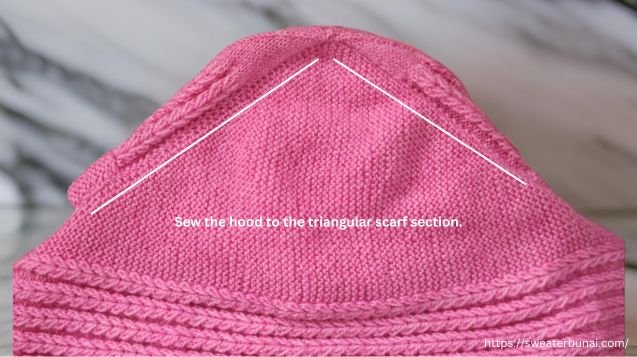
Finally, we need to attach the hood to the scarf. First, we will fold the border of the hood upwards and stitch it in place. Then, we will join the hood and the triangular section of the scarf. After that, we will connect both parts together.
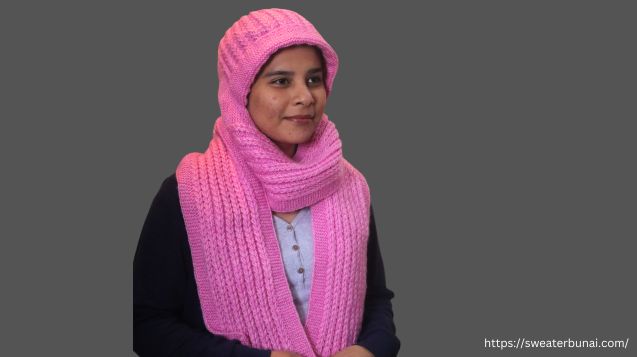
Our hood is now attached to the scarf. We hope you all love this hooded scarf pattern and give it a try. Thank you!
Complete Video Tutorial for Hooded Scarf Knitting Pattern
Share Your Handmade Headgear to Motivate the Knitting Community
I hope you love the Hooded Scarf Knitting Pattern and will give it a try! Please share your knitted headgear with us; we would love to see it.
Feel free to review the pattern and share your feedback in the comments — thank you!
Also, check out our other free headgear patterns, including the headband and hat.
Sunayana’s Hooded Scarf – All Your Questions Answered
Can I make the scarf longer?
Yes, you can! Simply add more rows to the scarf to make it as long as you like.
Can I knit the scarf without the heart ribbing pattern?
Yes! You can opt for a simple stockinette stitch, garter stitch, or any other stitch pattern that you prefer.
What is the purpose of the triangular section in the scarf?
The triangular section helps to shape the scarf and provides a smooth, natural connection point for attaching the hood.
Is a free printable Hooded Scarf knitting pattern available?
No, the pattern is not available as a free printable. However, you can copy and paste the pattern and then convert it to a PDF. Alternatively, you can remove ads through your web browser for an ad-free experience.
Please could you advise what weight yarn you have used, I have tried to google the brand but with no conclusion. The needle size suggests that it is not a bulky yarn but yet the garment looks like the yarn is more thick than a 4 ply or DK
Thank you