Hi, I am Sunayana Negi, and today I am going to share a free reversible knit hat pattern with you. You can knit this hat for any age group and gender. The design in this hat is just a knit & purl pattern, so even beginners can knit it very easily.
For your convenience, I have also shared a video tutorial of the hat. So, let’s learn how to make a reversible knit-purl stitches beginner hat.
Table of Contents
Get Ready to Knit: Materials for the Reversible Hat Pattern
Knitting Yarn: Vardhman Woolista Wool (100% Pure Merino wool yarn)
Knitting Needles: 10 (3.25 mm UK Size) number straight needles.
Optional materials include a measuring tape, scissors, and a darning needle.
Abbreviation Guide for the Reversible Knit Hat
P2tog: Purl 2 sts together
K2tog: Knit 2 sts together
SL(P): Slip(Purl Wise)
K: Knit
P: Purl
STS: Stitches
RS: Right Side
WS: Wrong Side
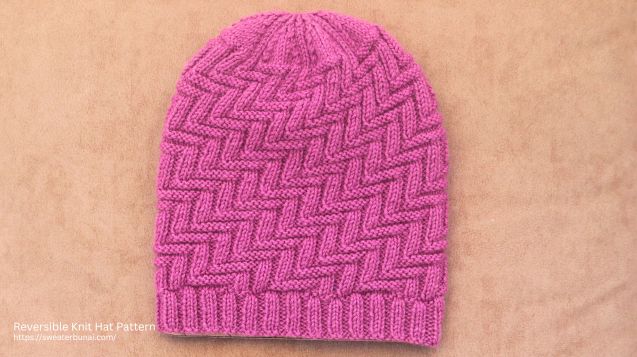
Sunayana Negi’s Free Reversible Knit Hat Pattern – Perfect for Winter & Fall
Reversible Hat size: Unisex Hat (To fit head circumference: 21-22”/23-24”, Length from brim to top: approximately 9”.
Skills: Beginner/Intermediate.
Skills used in the pattern: Casting On, 2×2 Ribbed Border, 16 rows repeat knit purl stitches, Decreases & Sewing Together a Seam.
Cast on: 114 sts.

Step-by-Step Guide to the 2×2 Ribbed Border
I’ve made a simple 2×2 ribbed stitch border for the hat. You can adjust the length of the border as per your preference—make it shorter or longer as you like. The border pattern for the hat is given below.
Row 1(RS) – SL1 (P), * P2, K2 * repeat from * to * ……………last sts P1
Row 2(WS) – SL1 (P), * P2, K2 * repeat from * to * ……………last sts P1
Repeat these 2 rows to complete a 1-inch (2X2 Ribbed Stitches) border. I have knitted 10 rows for the border.
Knitting the Body of the Reversible Hat
The design pattern is 16 stitches and 16 rows. I’ve cast on 114 stitches for the hat, and since the pattern is 16 stitches wide, we’ve repeated it 7 times. Additionally, I’ve added 2 extra stitches for the edges. The edge stitches are worked in purl.
Row 1 – SL1(P), * P8, K2, P2, K2, P2 * repeat from * to * ………………last sts P1
Row 2 – SL1(P), * K2, P2, K2, P2, K8 * repeat from * to * ………………last sts P1
Row 3 – SL1(P), * K10, P2, K2, P2 * repeat from * to * ……………last sts P1
Row 4 – SL1(P), * K2, P2, K2, P10 * repeat from * to * ……………last sts P1
Row 5 – SL1(P), * K2, P10, K2, P2 * repeat from * to * …………last sts P1
Row 6 – SL1(P), * K2, P2, K10, P2 * repeat from * to * ……………last sts P1
Row 7 – SL1(P), * K2, P2, K10, P2 * repeat from * to * …………last sts P1
Row 8 – SL1(P), * K2, P10, K2, P2 * repeat from * to * …………last sts P1
Row 9 – SL1(P), * K2, P2, K2, P10 * repeat from * to * …………last sts P1
Row 10 – SL1(P), * K10, P2, K2, P2 * repeat from * to * …………last sts P1
Row 11 – SL1(P), * K2, P2, K2, P2, K8 * repeat from * to * …………last sts P1
Row 12 – SL1(P), * P8, K2, P2, K2, P2 * repeat from * to * ……………last sts P1
Row 13 – SL1(P), * P4, K2, P2, K2, P6 * repeat from * to * …………last sts P1
Row 14 – SL1(P), * K6, P2, K2, P2, K4 * repeat from * to * …………last sts P1
Row 15 – SL1(P), * K6, P2, K2, P2, K4 * repeat from * to * ………last sts P1
Row 16 – SL1(P), * P4, K2, P2, K2, P6 * repeat from * to * …………last sts P1
Repeat these 16 rows to complete the length of the hat. I have knitted approximately 8 inches (1 inch for the border + 7 inches for the body part).
Here, I’ve knitted the full pattern 5 times and added 10 more rows. After that, we’ll bind off the hat.

Binding Off the Reversible Knit Hat: A Quick Guide
Bind-off pattern is shared below.
Row 1(RS) – SL1, * K2, P2, K2, P2tog, P6, P2tog * repeat from * to * ……………last sts P1
Now, 100 stitches are remaining.
Row 2(WS) – SL1, * K8, P2, K2, P2 * repeat from * to * ……………last sts P1
Row 3(RS) – SL1, * K2, P2, K2, P2tog, P4, P2tog * repeat from * to * ……………………last sts P1
Now, 86 stitches are remaining.
Row 4(WS) – SL1, * K6, P2, K2, P2 * repeat from * to * ………last sts P1
Row 5(RS) – SL1, * K2, P2, K2, P2tog, P2, P2tog * repeat from * to * ……………………last sts P1
Now, 72 stitches are remaining.
Row 6(WS) – SL1, * K4, P2, K2, P2 * repeat from * to * ………… last sts P1
Row 7(RS) – SL1, * K2, P2, K2, P2tog, P2tog * repeat from * to * ………………………last sts P1
Now, 58 stitches are remaining.
Row 8(WS) – SL1, * K2, P2 * repeat from * to * ………… last sts P1
Row 9(RS) – SL1, * K2tog, P2tog * repeat from * to * ………………last sts P1
Now, 30 stitches are remaining.
Row 10(WS) – SL1, * K1, P1 * repeat from * to * ………….. last sts P1
Finally, pick up all the remaining 30 stitches on the swing needle and secure them tightly. After that, sew the hat.
Video Tutorial: Learn How to Knit the Reversible Hat
Your Reversible Hat—We’d Love to See It!
How did you like the Reversible Knit Hat Pattern? Please let me know by leaving a comment. I’ve posted more beginner hat tutorials like this on my website, so do check it out.
Also, follow my Facebook Page to get regular updates on my knitting projects. You can share any knitting projects you’ve made in our Facebook Group—I’d love to see them!
I hope you’ll continue to stay connected with me like this. Thanks!
Common Questions About the Reversible Knit Hat
What does a reversible knit hat pattern mean?
It means that knit purl stitches are used to make this hat, and it can be worn on both sides.
Is this pattern suitable for beginners?
Absolutely! It’s beginner-friendly, focusing on basic knit and purl stitches.
Can I use a different stitch pattern for the border?
Yes, feel free to experiment with other ribbing styles.
How do I make the hat slouchy instead of fitted?
Add extra rows to the body or increase the cast-on stitches.
Can this be knit in the round?
Yes, you can. I don’t like circular needles, so I seamed it.
Getting lost in too many ads. Sorry!
For an ad-free experience, block ads using your browser. You can Google how to do it.
In your video for the ribbing you purl the 1st 3 stitches but in your directions it says to SL1P then you start the P2 K2 until the last stitch you P.
Also crying your voice is in arabic so I dont understand 🙁
The first stitch is an edge stitch; you can either purl it or slip it, depending on your preference.